Hand-rearing and rehabilitation of corvids: House crow and Jungle crow
Devna Arora
Introduction
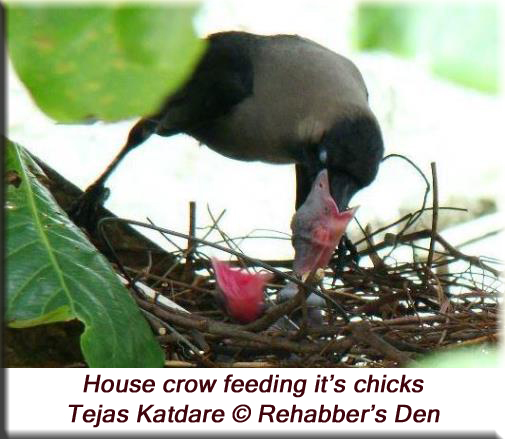
The House crow (Corvus splendens) and the Jungle crow (Corvus macrorhynchos) are two of the commonest species of India – both widespread and sympatric in distribution, commonly found in cities and as far as man goes. They have well followed man outside their native range. Although there are few differences in the habits of each of the species, the house crow is comparatively more gregarious and tames easily. Both are highly observant and intelligent species – carefully watching and following human movement.
Although the house crow is known to be a summer breeder breeding between March and June, the Jungle crow is primarily known to be a winter breeder breeding between December and February, but the breeding seasons’ well overlap with both species mostly breeding in the summer months. Each species lays 4 eggs on average, some of which may be replaced by the koels (Eudynamys scolopaceus), in a large nest cup made up of twigs, grass, leaves, wool, hair, etc. Nests are typically placed high up in trees.
Need for assistance
Baby crows are seldom found as smaller chicks, i.e., unfeathered chicks, unless the entire nesting tree has fallen or has been felled. Damage during storms is also significantly less as they build (owing to their larger size I presume) their nests on studier branches. Where fallen chicks or nests are found, they may be placed in sturdy wicker baskets and placed high on the tree or possibly an adjacent tree if the nesting tree itself has fallen. Some people have found it tricky to reunite babies (the smaller ones) in the past, and unless the parents accept them and the other crows don’t bother them, the chicks have been taken in for hand-rearing.
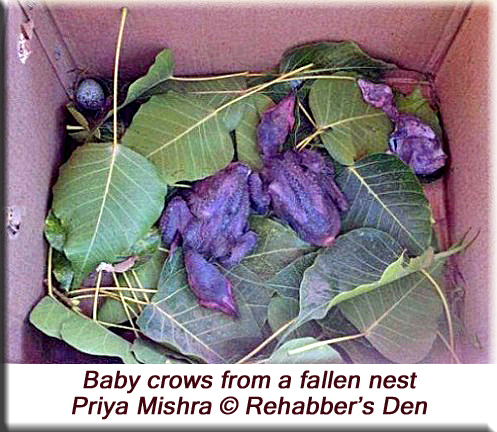
Unfledged babies (esp. when unfeathered) that have fallen from a height are highly likely to have sustained injuries, particularly internal injuries. High mortality is observed in these babies if they cannot be assisted.
Chicks are more commonly found at the fledgling stage and even though they may be on the ground, they are very strongly guarded by the entire crow community. As long as the babies are healthy and without any physical damage, they may simply be placed on the nesting tree or the nearest tree (although they do normally need to be placed high up), preferably closer to the other siblings if they can be located and the parents will continue to look after them. Injured babies may also be treated and then reunited with their flocks as corvids form strong bonds with their families and they benefit most by being with their own parents.
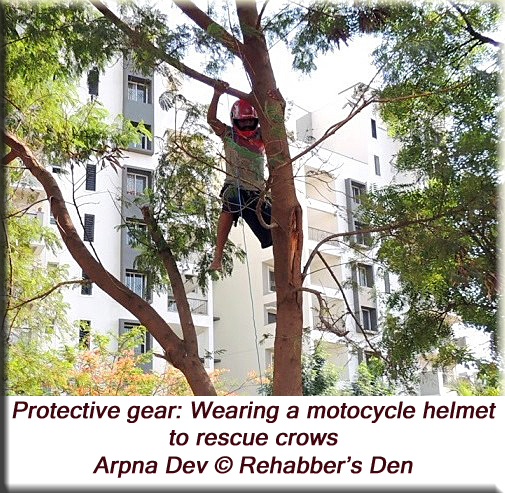
N.B. Crows will mob any predator (including the rescuers) in great numbers. They can and will come at you from all sides and their beak can cause significant damage. So please ensure to wear some protective gear when going in to rescue/assist crows. I personally prefer to use a full-face motorcycle helmet with the visor covering the eyes; perhaps a full-sleeved shirt and some gloves would also be helpful but I would say a helmet is very important or some kind of protective glasses covering the eyes at the minimum.
Identifying baby crows
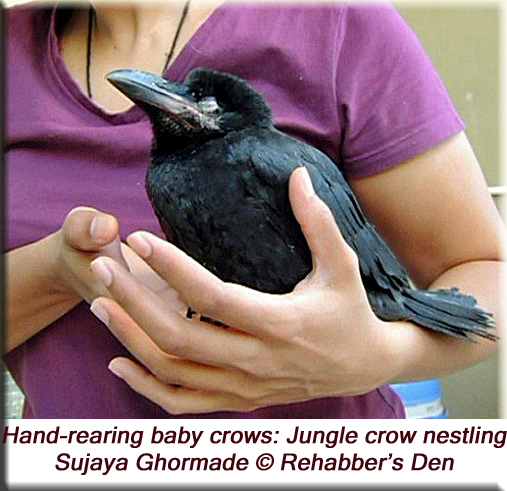
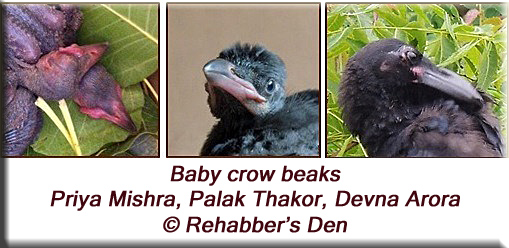
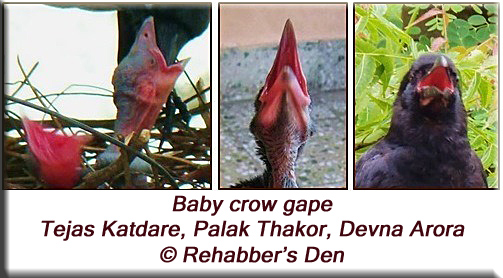
First and foremost, baby crows are bigger than the average baby passerine and even younger babies will likely fill your entire palm when you hold them. The beak is heavy in proportion to the body and characteristically pink in colour. The gape is a bright pink (verging on red) and the gape flange (at the base of the beak) is again pink. The beak darkens as the chick grows, turning to black by the time the birds fledge but the gape flange, i.e., the base of the beak is a visible pink in newly fledged babies that are still dependent upon their parents.
General guidelines for hand-rearing corvids
Hygiene
The chicks must be kept in hygienic conditions until they are ready to fledge as younger chicks can be highly susceptible infections. Hands must be washed every single time before touching the nestlings. Excessive handling of the chicks must be avoided and they must only be handled during feeding time, although it will be absolutely unnecessary to touch the chicks even when feeding them.
The chicks will defecate several times through the day. Their bedding must be kept clean and changed as often as required to prevent the droppings from sticking to the chick’s skin and feathers. [Droppings harden after sticking to the body and are extremely painful to remove and inevitably peel off with a bit of skin, exposing raw skin to bacterial infections.]
To remove any dried food particles or droppings that have stuck to the skin or feathers of the baby birds, wet the area with a drop of warm water and allow it to soak for a minute or two before attempting to remove it with your finger or with a piece of wet cloth. The procedure must be repeated if the particle doesn’t completely come out in the first attempt.
Housing
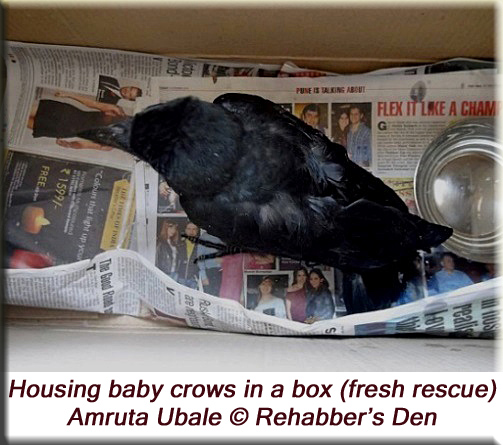
Baby birds can be housed comfortably in a basket or a cardboard box while new born chicks may be kept in an incubator. A nesting cup (which is simply a shallow bowl or cup-shaped basket lined with soft tissue or cotton cloth) must be used for smaller chicks as it supports their bodies better. To prevent splayed legs, the chicks must not be kept on a smooth surface; they will benefit from a rough base which could be a layer of straw or sticks at the base of the basket which is then covered with paper towels or cotton cloth. The sticks/straw will give will give them adequate gripping while the paper towels or cloth will be easy to change when soiled. Younger chicks must never be placed on the cotton towels (Turkish towels) directly as their nails tend to get caught in the fibrous loops of the towels. Cotton too must never be used to line the nests as it soaks the droppings and sticks to the baby birds, making it painful to be removed.
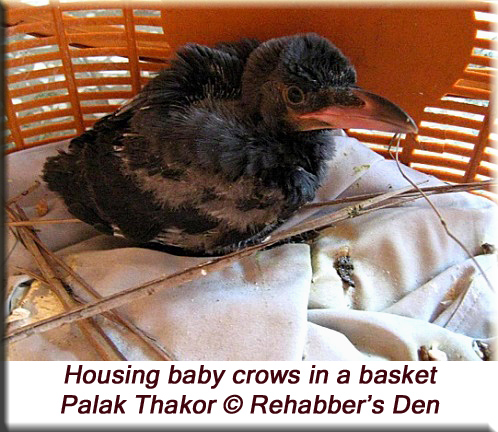
Weaker babies (until stronger) must be kept separate from the stronger ones so they don’t get bullied or pushed aside while being fed.
In nature, the young birds tend to move away from the nest and remain on adjoining branches prior to fledging. Similarly, the chicks may ideally be shifted to smaller enclosures with some low perches for the chicks to move around and sit on. On fledging, the chicks must be shifted to an aviary for adequate flight exercise before release. Crows are large-winged birds and must be shifted to an aviary of at least 12 ft. X 30 ft. and 12-15 feet high. The aviary must be equipped with several perches at different levels and some foliage (preferably at least 1 large tree in the case of crows) but must also allow the birds to fly about freely and exercise their fight muscles.
Inter-species interactions
The chicks must never be housed in close proximity to predatory species like cats, dogs, or larger birds of prey or other predators. Housing the chicks in close proximity to such species will either lead to constant stress due to the smells, sounds and movements of the predators; or it will lead to habituation and lack of fear and decrease their chances of survival after release.
Imprinting and dependency
Imprinting is a process whereby a young animal learns and imitates the behaviour traits of its parents. It serves as a method of instilling the appropriate behaviour and survival traits in young animals.
Under unnatural conditions of captivity, the chicks may imprint on humans and other animals they are constantly exposed to – since parental learning is higher in corvids, they seem to be more prone to malimprinting. To prevent this, they must never be handled excessively or exposed to too many people and animals, and handling must cease as soon as they chicks are able to eat on their own. This also keeps them from becoming excessively dependent on the caregivers. Especially in the case of corvids, they must be housed with other corvids or somewhere where they can observe and learn from members of the same species.
Warmth
New-born chicks require additional warmth to maintain their body temperatures in the initial weeks of their lives and must always feel slightly warm on touch. Since crows are primarily summer nesters, it’s important to find a balance between providing heat and avoiding overheating. As a rule of thumb, the smaller the chick, the more warmth it will require. Unfeathered chicks will require external heat all day long. The intensity of heat required will gradually reduce as the chicks become adequately feathered and completely discontinued upon fledging. Baby birds found in the warmer months of the year will require little additional heat when kept at room temperatures but those found in the colder months of the year will require additional warmth throughout the day and will need to be monitored closely.
External heat may be provided in the form of incubators, heating lamps or hot-water bottles. Most breeding and rescue centres are equipped with incubators and prefer the same for baby birds. It is easiest to both control and monitor the temperature of the nest chamber when using incubators. But these may not be easily available to individual rescuers, in which case, alternate methods of providing external heat may be used.
Heating lamps adequately serve the purpose of providing heat for nestlings. The distance of the heating lamp from the box will depend upon the local weather conditions, the wattage of the bulb and the body condition of the chicks. A room thermometer placed in the box will help you gauge the temperature and adjust the distance of lamp as and when required. Chicks that get too warm will pant to decrease their body temperature. If such behaviour is noticed, external heat must be reduced and ventilation increased immediately to prevent over-heating. Excessive heat will also result in dehydration and the temperature must therefore be monitored and maintained closely. The box must be covered with a dark cloth at night to prevent the light of the lamp from falling directly on the chicks and interrupting the natural circadian rhythm of the chicks.
Hot-water bottles may also be used for the chicks and are safe to use with smaller birds. The bottle, wrapped in a couple of layers of cloth, must be placed under the chick’s bedding and you must ensure that the chicks cannot come in direct contact with the bottle as they will scald if they do. Hot-water bottles must only be placed under half of the chick’s bedding leaving them the flexibility to shift to the uncovered part of the box if they get too warm. Hot-water bottles may even be placed just outside the box while still touching the box to ensure adequate warmth.
Water and hydration
Baby birds are seldom given water orally. They receive adequate water through their feeds. Baby birds must be offered soft and moist foods as it both assists digestion and ensures sufficient hydration. Mild dehydration may be addressed by offering the chick softer foods or formulas until dehydration has been addressed. To help restore the electrolyte balance in dehydrated chicks, rehydration electrolytes may be added to the formula. Refrain from administering water orally as the risk of water going down the trachea and aspirating the chick is high. If severe dehydration exists, the chick may be given fluids subcutaneously but this must only be done by an avian veterinarian. Severely dehydrated chicks must only be fed after dehydration has been addressed.
Baby birds that are dehydrated will appear weak and listless. Their skin, especially around the breast and stomach, will appear tighter and wrinkled. The skin turgor test or the ‘tent test’ may also be used to assess dehydration in naked hatchlings. Well hydrated chicks, on the other hand, are soft to touch and appear rounded and well. They will also be a lot more active and interested in sounds and movements around them than are dehydrated chicks.
Feed and formulas
Crows are omnivorous birds that consume a high amount of animal protein (birds, mammals, chicks, insects, road kills, etc.) along with some grains and some fruits and vegetables. Chicks are fed high amounts of animal protein: At least 40-50% animal protein for younger chicks and 30-40% animal protein for older chicks. Diet in captivity primarily includes shredded chicken or fish (deboned), infant (human) foods – chicken, fish or turkey, pinkie mice, cat food jellies or puppy food pouches, boiled or scrambled egg, caterpillars, crickets, nuts, some fruit, berries and vegetable, corn, oats, dough made of sattu (flour made of roasted pulses and cereals) and maybe some cooked rice or chapattis. Babies are fed ad libitum from sunrise to sunset but naked babies may be fed until 10 pm or midnight. If feeding several chicks, you must ensure that all chicks are well fed as the runts or weaker chicks often get pushed aside and may consequently get weaker if not given adequate attention.
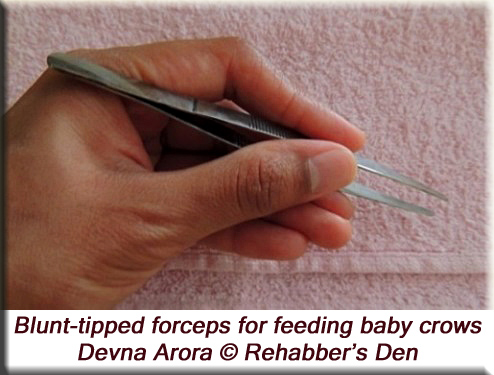
Although naked babies may be given a formula (pureed foods), they do very well on soft mashed food which can either be fed by hand or preferably with a pair of blunt-tipped forceps. Soft boluses must be made appropriate to the size of the bird and simply be dropped further into the mouth behind the tongue. Babies typically gape on sight but may be coaxed if the gaping reflex isn’t strong. Once fledged, the chicks will eat on their own and will only require supplemental hand feeding till they are independent.
Avian vitamins and calcium supplements must be added to the formula for baby birds. The next best choice to avian supplements (if none available) would be other veterinary or paediatric vitamin drops – choose a supplement with added minerals too. Most multivitamin combinations do not include calcium and this must be supplemented as well – veterinary calcium drops are a good option. Probiotics too may be added to the chick’s diet. Avian probiotics are of course the first choice but human or veterinary probiotics, for example, Gutwell, too will be helpful. The exact doses may be obtained from an avian veterinarian.
The chick must be given a warm feed just as mammalian young are given warm milk. Formula that is too hot will scald the baby bird’s crop causing crop burn – which is the scalding of the chick’s crop and oesophagus. Cold formula on the other hand will slow the process of digestion and cause ‘sour crop’. Sour crop is a condition in which the formula in the chick’s crop has gone bad as the contents of the crop have not emptied.
Feeding instructions
The chick can be placed on a napkin or paper towel on a table so you can feed the chick in a comfortable position. You can also feed the chick when he/she’s in the basket but all spilled food must be picked up immediately, often necessitating the bedding to be changed after feeds.
The chicks gape as soon as the feeder approaches them. If not, you may gently tap on the chick’s beak to stimulate a begging and feeding response. The chick must be given time to swallow the first morsel before the second one is offered. The chicks will only have a couple of morsels at a time and refuse to gape once they are full. Feeding must be stopped immediately.
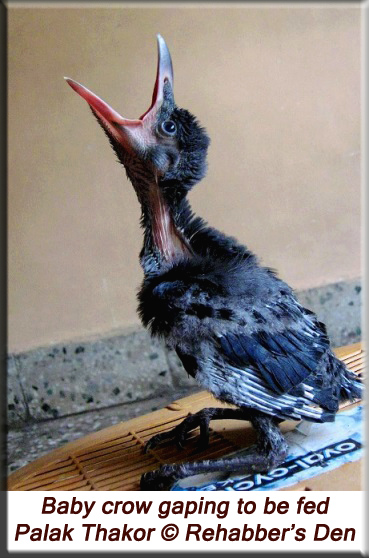
The baby must not be forced to feed when it is reluctant to accept food. Force feeding or over feeding can cause the feed to flow into the throat and down its windpipe, which can be life threatening. The beak and feathers must be wiped gently with a moist cloth after feeding.
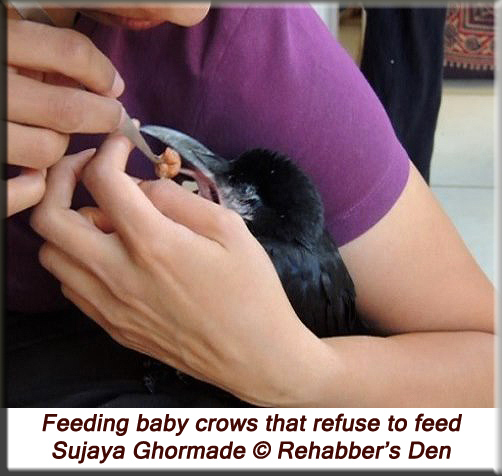
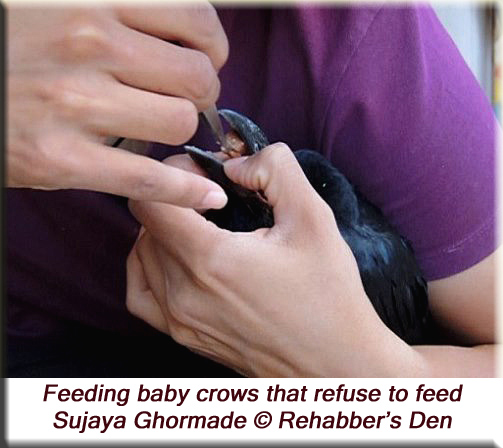
Younger babies gape and beg for food at the slightest of movement around them but older babies, fledglings particularly, show recognition and newly rescued birds will not readily gape and ask for food until they have settled down with you. They will need to be handled gently but may also need to be force fed until they begin eating on their own – this process must be very calm and gentle without giving the bird a chance to struggle in any way yet handling must be minimal. The better you handle them, the sooner the lil’ guys will settle down.
For larger-sized fledglings like those of corvids, the moment you try and open their beak, they will uneasily start fluttering and immediately back away. So the easiest way to feed them is by placing them on your lap (it helps if you squat in this case) or a table, wrapping your arm around them (without applying any pressure – this will simply act as a barrier the bird cannot further back into) and using an underhand grip to open the lower mandible of their beak. A small morsel of food can then be dropped deep into their mouth behind the tongue. The bird must be given a few minutes to swallow and settle down before the next morsel is offered – you must loosen your grip around the bird in the meanwhile. Once the bird has settled down (hopefully over a day), he/she will slowly start asking for food.
You must resort to minimal handling once that happens and holding them in this manner will no longer be necessary and must not be continued.
Baby bird droppings
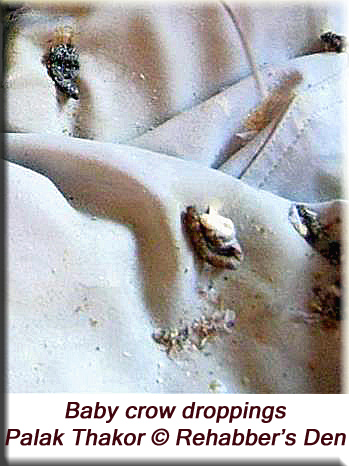
Baby bird droppings can vary considerably depending upon the food offered although droppings tend to be darker coloured when using dog/cat food. As long as the droppings are well-formed and not runny, I guess it is okay. I truly apologize, I’m not able to elaborate on this at this time and don’t have more photographs of baby crow droppings to share.
Internal and external parasites
Baby birds are highly prone to heavy infestations of external parasites until they have begun to groom themselves effectively as their parents perform this task till the babies are fairly independent. To keep the fleas/lice under control, 0.1 ml of external use Ivermectin may be dabbed behind the neck of each bird or a spray containing Fipronil (for example, Frontline or Protector) may be dabbed behind the neck and under the wings of each bird. The bedding of the chicks must be replaced to prevent any fleas/lice from climbing back on them.
Due to their habit of scavenging and their high dependence on raw meats, crows are also highly susceptible to internal parasites. Ivermectin may be used at a dose of 200 mcg/kilo body weight to deworm the birds (Stocker 2005). It is always a good practice to deworm them at least once prior to release (or in-situacclimatization) to prevent the spread of any parasites to wild populations.
Handling young crows
Since they are large-sized birds, it is almost impossible to hold young crows with one hand. People normally resort to a two-hand grip with one hand over the bird and one hand under – in most cases, the grip is wrong if you don’t know what you are doing. Please be extremely careful when handling to prevent damage or making the bird uncomfortable.
Never place your hand under the bird’s crop when holding them. Undue pressure on the crop can result in damage and regurgitation and possible choking. The grip must always be closer to the legs when supporting the lower part of the bird’s body.
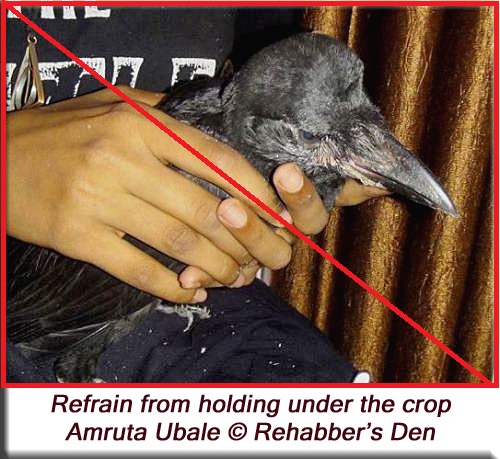
Never lift the bird in a similar manner, i.e., with the hand under the chest or the crop. This can not only result in damage and choking but will also result in ‘balling’ of the feet. A bird’s leg needs to grip something. The moment you lift them without supporting their feet, they tend to clench their feet/claws and the nails dig in to the flesh causing damage repeatedly. This can be a major problem with birds of prey and other large birds with big nails and every care must be taken to prevent this. Birds are already prone to doing this when they are stressed and particular care must be taken to prevent any damage.
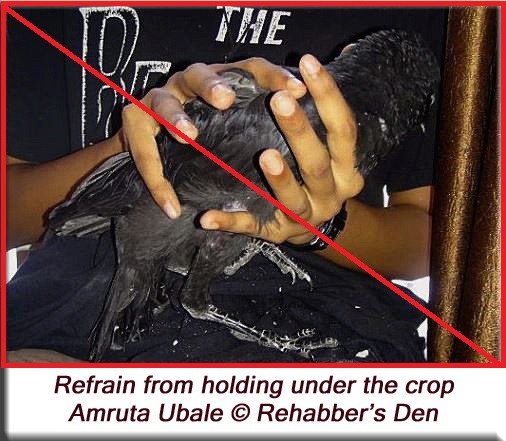
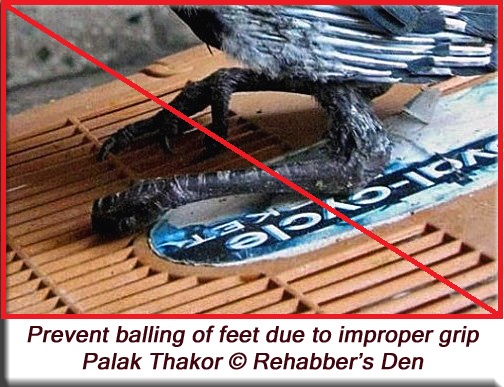
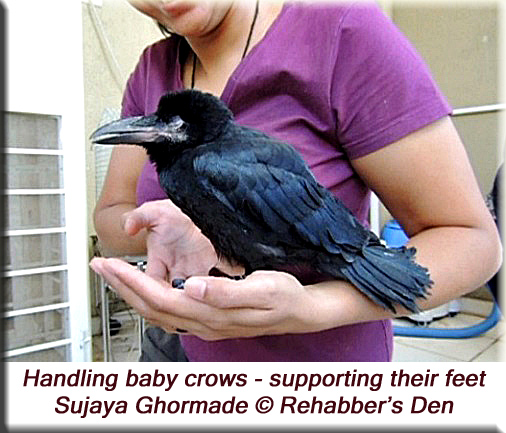
The best way to hold baby crows is by supporting their feet. I personally prefer to let them rest their feet on my palm and then gently lift them. Once the baby bird feels safe and secure, it will stay put and not attempt to move or get away. The less you handle them, the more comfortable they feel. This works perfectly as the baby bird is secure, which is vital, and the feet are placed properly. If at all they must be lifted (not recommended), you can place a roll of newspaper or something between their feet to prevent the nails from digging in.
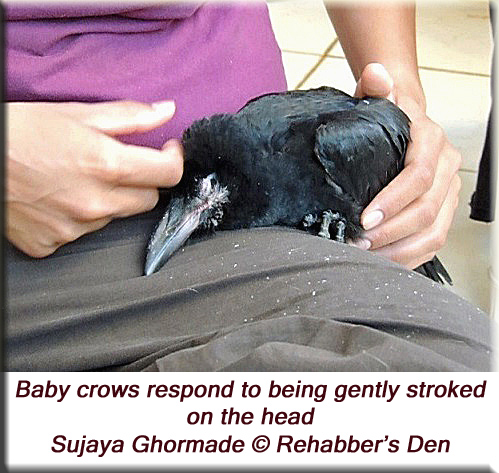
Here’s a lil’ trick the baby birds may like: if you gently stroke them on the head, they will immediately submit to you and put their head down for you to preen them – this is what their parents do when they preen the younger babies. In fact, babies that don’t obey are pecked and corrected – wouldn’t recommend you do that though :o)
Continue to Page 2: growth and corresponding care
Please note: This document is targeted at hand-rearing alone and does not address or substitute any veterinary procedures. For any medical concerns, please consult your veterinarian at the earliest.
For amateurs or people handling new born chicks for the very first time, please keep in touch with a trained and experienced hand for guidance and regular progress updates.
Protocol published in 2014

